Host LNPlay
Want to host your own LNPlay simulation? LNPlay.guide provides all the resources you need to get started!

Ok, you want to host an event that utilizes LNPlay. Great! This makes you a System Owner. These instructions are the most direct way to host a large instance, but there are a few steps to get it all going. Of course, you can always purchase a smaller hosted instance over at lnplay.live (currently under construction). These instructions use AWS, but any hosting provider with Ubuntu Server 22.04 should work.
Prerequisites
First, make sure you have a hosting provider. These instructions assume you have an AWS account, but any EC2-like provider should work. All you will be doing is deploying an EC2 instance to an AWS data center and then using SSH (and SCP) to control and manage the remote VM.
You will also need a domain name and the ability to create two A records under your chosen domain. These instructions use remote.rocketcitybitcoin.org to serve Clams Remote and lnplay.rocketcitybitcoin.org for the backend CLN endpoints.
rocketcitybitcoin.org is the example domain!One-time steps
If this is your first time through this guide or you have a brand new AWS account or domain, you may have to implement the following sections.
Create a Security Group
Your AWS should have a Security Group called LNPlay. If it doesn't, create one by logging into the AWS EC2 console, then select Security Groups under the Network & Security heading on the left.
Then click the Create Security Group button. The name should be LNPlay and the description should be PPS for LNPlay.
Next, add the following Inbound Rules:
| Port | Proto | Service | Description |
|---|---|---|---|
| 22 | TCP | SSH | To remotely control the instance from your management machine. |
| 80 | TCP | HTTP | Redirect to HTTPS |
| 443 | TCP | https:// | Serves Clams Remote |
| 6001-6255 | TCP | wss:// | CLN websocket endpoints. Adjust port based on CLN_COUNT. |
| 9001-9255 | TCP | https:// | CLN REST API Adjust end port based on CLN_COUNT. |
Make sure to choose ipv4 under the Source drop-down for every Inbound Rule.
That's it! Click the "Create Security Group" button. Now, wherever you deploy an instance of LNPlay, just select the LNPlay security group for firewall rules on the instance.
Create an Elastic IP (optional)
If you expect to deploy LNPlay instances repeatedly, it might make sense to use a dedicated IP address so you don't have to update your DNS records every time you create an instance.
To do this, reserve a public IP address in AWS (called an Elastic IP), then re-use that Elastic IP across instances of LNPlay. Click "Elastic IPs" under the "Network & Security" grouping then click "Allocate Elastic IP address". Next, change the name of the Elastic IP to your DNS hostname, e.g., lnplay.rocketcitybitcoin.org.
Create an A Record in DNS
Login to your name provider and configure your chosen domain, for example, rocketcitybitcoin.org. In our example, we're putting a host at lnplay.rocketcitybitcoin.org AND remote.rocketcitybitcoin.org.
To verify that your DNS is configured properly, run a dig command from your management machine on both host names. The IP address listed in the answer section should be the Elastic IP we allocated above.
$ dig @8.8.8.8 lnplay.rocketcitybitcoin.org

; <<>> DiG 9.18.18-0ubuntu0.22.04.1-Ubuntu <<>> @8.8.8.8 lnplay.rocketcitybitcoin.org
; (1 server found)
;; global options: +cmd
;; Got answer:
;; ->>HEADER<<- opcode: QUERY, status: NOERROR, id: 58075
;; flags: qr rd ra ad; QUERY: 1, ANSWER: 1, AUTHORITY: 0, ADDITIONAL: 1

;; OPT PSEUDOSECTION:
; EDNS: version: 0, flags:; udp: 512
;; QUESTION SECTION:
;lnplay.rocketcitybitcoin.org.	IN	A

;; ANSWER SECTION:
lnplay.rocketcitybitcoin.org. 1799 IN	A	54.147.118.106

;; Query time: 68 msec
;; SERVER: 8.8.8.8#53(8.8.8.8) (UDP)
;; WHEN: Tue Jan 16 13:04:21 EST 2024
;; MSG SIZE  rcvd: 73
Steps for each LNPlay Event
Ok, you've got the LNPlay Security Group in place and you've configured your DNS properly. The next step is to spawn a new VM that uses that Security Group and is reachable at the correct IP address. Your end goal is to ssh lnplay.rocketcitybitcoin.org and you're at the terminal of the remote AWS host.
Create an EC2 Instance
First click "Instances" on the left, then click "Launch Instance". For the name of the instance, just use the hostname you've identified. In our example lnplay.rocketcitybitcoin.org.
Next, click Ubuntu under the Quick Start section. We'll be using the standard Ubuntu Server 22.04 LTS AMI.
Next, you need to size the instance. We generally do this based on the maximum number of CLN nodes you expect to deploy:
| CLN_COUNT | vCPU | Mem (GiB) | Instance type |
|---|---|---|---|
| Up to 32 | 2 | 4 | t2.medium |
| 64 | 4 | 8 | c5.xlarge |
| 128 | 4 | 16 | t2.xlarge |
| 256 | 8 | 32 | t2.2xlarge |
Under the "Key pair (login)" section, generally you will want to "Create a new key pair". Name the key pair the same as your host, in our case lnplay.rocketcitybitcoin.org. Select the "ED25519" in a .pem format, then save the .pem in your ~/.ssh directory. Usually, these private keys require a chmod 0600 ~/.ssh/lnplay.rocketcitybitcoin.org.pem.
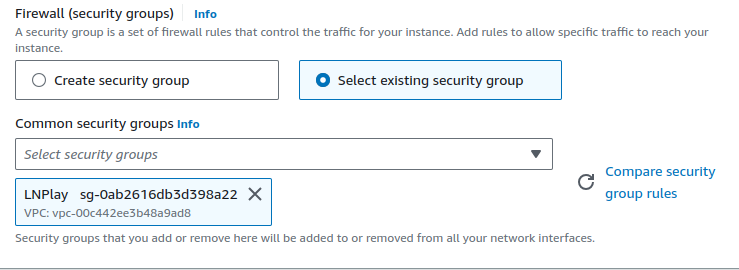
Under the Network Settings, select "Select existing security group" and then select the LNPlay security group.
Under Storage, enter the number of GiB you want to allocate to the instance. A quick heuristic that generally works is 1 GiB per CLN node. So deploy 200 GiB for a 200-node instance. This is probably overkill for most instances, so if you are price-sensitive, play around with this value.
Ok great, now click "Launch Instance" and navigate back to the "Instances" menu in the AWS Console.

The final step is to go back to your Elastic IPs and associate the LNPlay Elastic IP with the new instance.
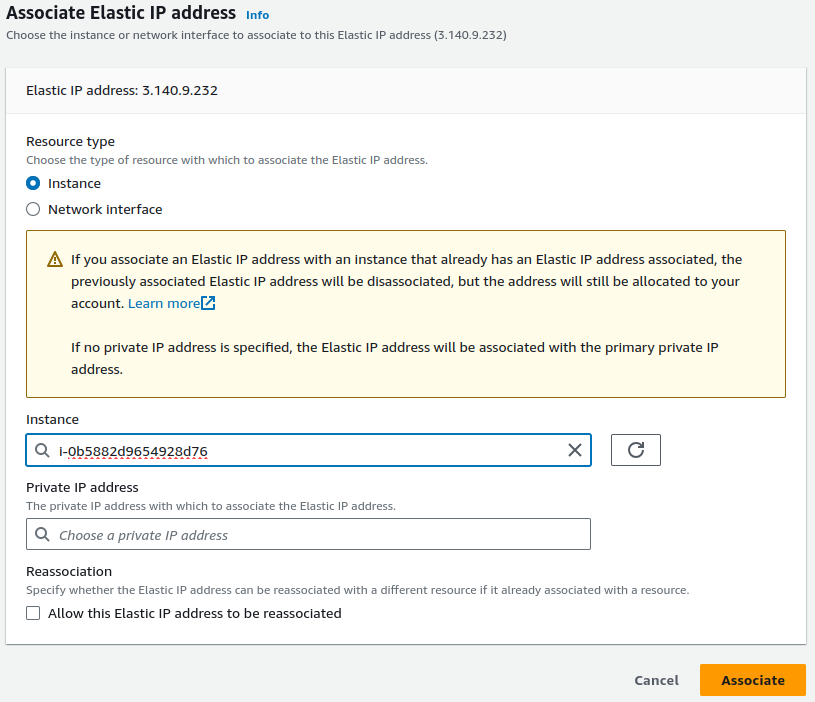
To verify, click back over to instances and check out the details for your new instance. It SHOULD have the IP address of the Elastic IP address you provisioned.
Configure SSH client
Alright, now back on your management machine. Your next step is to SSH into the remote machine. So make sure you have an SSH client installed and ready to configure.
Go update your ~/.ssh/config and add an entry for your new instance:
# file is ~/.ssh/config

Host lnplay.rocketcitybitcoin.org
    HostName lnplay.rocketcitybitcoin.org
    User ubuntu
    IdentityFile /home/ubuntu/.ssh/lnplay.rocketcitybitcoin.pem
You'll know if you did it correctly if you're able to run ssh lnplay.rocketcitybitcoin.org and gain access to the remote VM. You may have to answer "yes" to the fingerprint question so you can add an entry to your known_hosts.
$ ssh lnplay.rocketcitybitcoin.org
The authenticity of host 'lnplay.rocketcitybitcoin.org (3.140.9.232)' can't be established.
ED25519 key fingerprint is SHA256:nEvXMZPPXp2g+MZewl9bk1V9qivJ/xXwsmjh2tO1h28.
This key is not known by any other names
Are you sure you want to continue connecting (yes/no/[fingerprint])? yes
Warning: Permanently added 'lnplay.rocketcitybitcoin.org' (ED25519) to the list of known hosts.
Congrats! You did it! Now it's time to download LNPlay and get it deployed!